FAQ
General
Yes. Creating of backup copies in Comarch IBARD is completely safe. The data is sent through SSL 128-bit encrypted connection (the same kind of encryption is used in contacts with banks).
The data is stored in safe Comarch Data Center. A well-established position of Comarch Data Center in the area of security solutions results from the policy of long-wave investments in professional staff and knowledge of new technologies. Thanks to continuous effort put into improvement and development of Integrated Management System, Comarch Data Center received Integrated Management System certificates compatible with requirements of the following standards: EN-ISO 9001:2000 Quality Management System, EN-ISO 14001:2004 Environmental Management Systems, PN-N 18001:2004 Safety and Hygiene of Work Management Systems, ISO/IEC 27001:2005 Information Security Management Systems, as well as with criteria of Internal Control System (PN-N 19001:2006 Internal Control System (ICS)). The certificate was issued by Polish Center for Research and Certification (PCRC).
The data is stored in safe Comarch Data Center. A well-established position of Comarch Data Center in the area of security solutions results from the policy of long-wave investments in professional staff and knowledge of new technologies. Thanks to continuous effort put into improvement and development of Integrated Management System, Comarch Data Center received Integrated Management System certificates compatible with requirements of the following standards: EN-ISO 9001:2000 Quality Management System, EN-ISO 14001:2004 Environmental Management Systems, PN-N 18001:2004 Safety and Hygiene of Work Management Systems, ISO/IEC 27001:2005 Information Security Management Systems, as well as with criteria of Internal Control System (PN-N 19001:2006 Internal Control System (ICS)). The certificate was issued by Polish Center for Research and Certification (PCRC).
Comarch IBARD, apart from a basic function of online backup and archiving of data, is equipped with a range of additional functionalities. These are the most interesting of them:
– automatic backup of files, folders, MSSQL databases from PC, laptops, and servers;
– e-mail/sms notifications informing about current status of a given backup task;
– secure and easy sharing of data to other Comarch IBARD and Internet users;
– integration with Comarch ERP Optima – database backup directly from the program;
– creation and management of user accounts within the main account (e.g., permissions management)
– access to data through a web browser or application installed on a computer;
– management of files through mobile devices (smartphones, tablets);
– versioning of documents (20 previous versions);
Data backup with the use of Comarch IBARD is fast and easy. Comarch IBARD:
– Automatically creates backup copies of data from your PC or laptop, not interfering with data,
– Allows reliable and easy recovery of data,
– Protects data from such hazards as: viruses, computer theft, lost or damage of data,
– Allows users to access database backup copies through a secure connection to the Internet, by using any computer in any place in the world.
Comarch IBARD Backup Online acts as your personal cloud disk, where you can easily and safely store your data. Upon registration and installation, Comarch IBARD can be configured. Files and folders you want to secure can be:
– Copied to Comarch IBARD – selecting this option causes that a backup copy of data is created on the external disk.
– Added to backup – selecting this option causes, that a file or a folder is uploaded to Comarch IBARD disk and each change in folder contents or modification of a file on user’s computer is synchronized with the data sent to Comarch IBARD according to a selected schedule.
Comarch IBARD provides a possibility of encrypting selected data with the use of AES 265-bit algorithm. The data is encrypted on user’s computer with a previously generated encryption key.
AES (Advanced Encryption Standard) is a symmetric block cipher adopted as a standard by American National Institute of Standards and Technology. Security in such algorithm is based on secret key it uses – a string of bits of specified length, used for encrypting and decrypting of messages.
AES (Advanced Encryption Standard) is a symmetric block cipher adopted as a standard by American National Institute of Standards and Technology. Security in such algorithm is based on secret key it uses – a string of bits of specified length, used for encrypting and decrypting of messages.
The activation link is sent to an e-mail address entered upon service registration. The link is sent within 30 minutes after signup at the latest. First, it is necessary to check the SPAM folder. It is possible to generate another activation link with the option “Don’t remember password?” from the level of the login window.
It is not possible to recover a password. The most convenient way the user can log in after he or she forgot his/her password is to use the option “Don’t remember password?” located below the log in section.
In order to change an account’s e-mail address, it is necessary to log in to the Comarch Cloud panel and enter a new e-mail address on the tab My Data in the section E-mail. To complete the procedure of changing an e-mail address, it is necessary to confirm the change by clicking a link sent to the “new” e-mail address.
There are three way to access backup copies stored in Comarch IBARD:
– Desktop application installed on the user’s computer
– Web application that can be accessed on ibard.com in any web browser
– Mobile application for Android and iOS smartphones
– Desktop application installed on the user’s computer
– Web application that can be accessed on ibard.com in any web browser
– Mobile application for Android and iOS smartphones
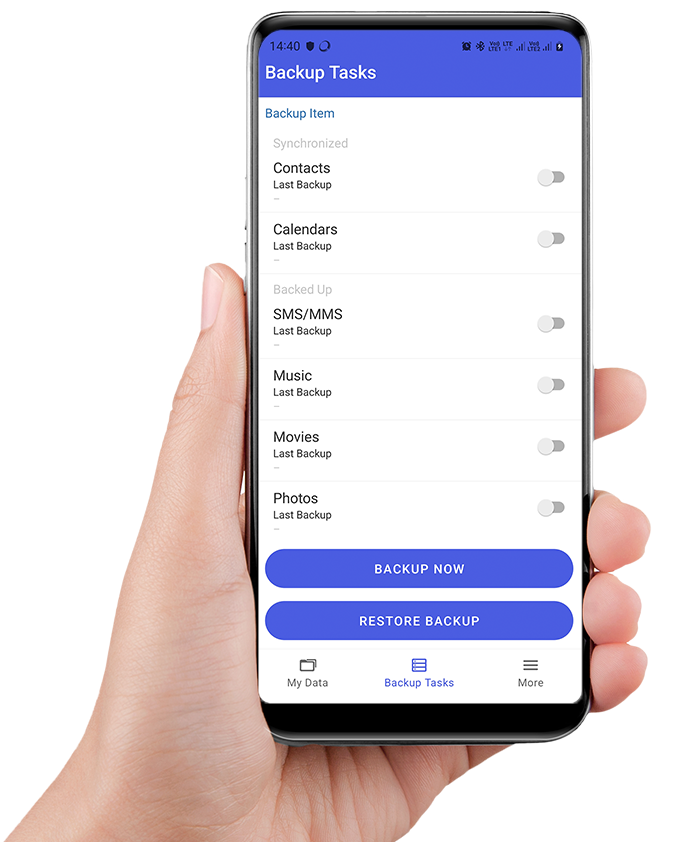
Yes. Comarch IBARD service can be used on any device with access to the Internet. An application dedicated to devices with Android and iOS is also available, and it allows:
– accessing the data stored in the cloud from a mobile device;
– downloading of files to a mobile device;
– sending of a photo to Comarch IBARD right after it is taken;
– backup of files and folders stored in a cell phone memory or on an external memory card (Android only);
– synchronization of contacts;
– synchronization of calendars;
– backup of SMS/MMS;
– backup of photos;
– backup of videos;
– backup of music;
– Polish, English, French, or German interface;
– sharing of files from a mobile device to other service and Internet users.
Comarch IBARD operates as a Windows service, that is, as a process executed in the background of Windows environment, not requiring interaction with a user. Comarch IBARD as a service responsible for backup of data, is run during startup of the operating system and is active as long as the system is functioning. This functionality – very useful on server platforms – is dedicated exclusively to companies. It consists of running of two processes: the first one – a service operating in the background, and the other one – GUI.
The first process – a Windows service – is run together with the system startup. Thanks to it, Comarch IBARD starts the backup of important data at the time the system is started, without necessity to login to the application.
The other process – GUI – is responsible for communication between a user and the application: adding of backup/copy tasks, specifying of a schedule, managing of the virtual disk, profiles, etc.
1) Operating system: 7, 8.x, 10, 2008 R2, 2012, 2016
2) Microsoft .NET Framework: Microsoft .NET 4.5
3) Browser: Internet Explorer 8.0, Firefox 5.0, Chrome 30
4) Disk storage: 20MB
5) Main memory: 256MB
6) Processor: Pentium IV
2) Microsoft .NET Framework: Microsoft .NET 4.5
3) Browser: Internet Explorer 8.0, Firefox 5.0, Chrome 30
4) Disk storage: 20MB
5) Main memory: 256MB
6) Processor: Pentium IV
If you do not have Framework .NET yet, and install on your computer download it from Microsoft.com website. This add-on allows for running and enables smooth functioning of Comarch IBARD application.
To run properly, Comarch IBARD requires the security update KB980436 (Note: The update may not be applicable in some Windows versions). Still, it is recommended to install all Windows Updates. Not only do they contain changes in the system itself, but also in the .NET Framework addon, on which Comarch IBARD depends. It affects the security, stability, and performance of both the Comarch IBARD client application and the entire system.
It is necessary to check if the relevant update has been installed on the computer.
To do so, it is necessary to select: Control Panel -> System and Security -> Windows Update -> Update History.
Next, it is necessary to check if the list of updates installed in the “Windows Update” program contains the KB980436 update. If you can find the update on the list, it means that you have the required update installed.
The best way to resolve this problem is to automatically update the system through the Windows Update program. However, if it is not possible for some reason, the KB980436 update needs to be downloaded from Microsoft’s website and installed manually:
Windows Server 2003: https://www.microsoft.com/en-us/download/details.aspx?id=1186
Windows Server 2003 x64: http://www.microsoft.com/en-us/download/details.aspx?id=9795
Windows XP: http://www.microsoft.com/en-us/download/details.aspx?id=5303
Windows XP x64: http://www.microsoft.com/en-us/download/details.aspx?id=10055
Vista: http://www.microsoft.com/en-us/download/details.aspx?id=14838
Vista: http://www.microsoft.com/en-us/download/details.aspx?id=22835
Windows 7: https://www.microsoft.com/en-us/download/details.aspx?id=10692
Windows 7 x64: http://www.microsoft.com/en-us/download/details.aspx?id=22642
Windows Server 2008: http://www.microsoft.com/en-us/download/details.aspx?id=10489
Windows Server 2008 x64: http://www.microsoft.com/en-us/download/details.aspx?id=13393
Windows Server 2008 R2: http://www.microsoft.com/en-us/download/details.aspx?id=16147
To be displayed properly, the website needs to be added to the Compatibility View in the browser settings.
Too add a website to the Compatibility View, it is necessary to select “Compatibility View settings” in the Tools menu and add the ibard.com website to the list.
Too add a website to the Compatibility View, it is necessary to select “Compatibility View settings” in the Tools menu and add the ibard.com website to the list.
VSS service is a part of Windows system which is used by Comarch Comarch IBARD. It allows the creation of automatic backup copy of files (backup online), which are at the same time used by other programs on a computer. If VSS stops, Comarch IBARD application cannot create backup copies of files being currently in use by other programs installed on a given user’s computer.
When VSS stops working, Comarch IBARD notifies about problem with access to that service. In this case, it is necessary to:
– restart VSS from the level of Windows Task Manager,
– if the above option does not repair the problem, files related VSS (advanced option) must be registered again (see example in English).
Login
Comarch IBARD allows logging in on two devices to one account at the same time with the use of one login and password. If a user is already logged in on two devices and wants to login to another one, it is necessary to log out from one of the devices. The application allows for logging out remotely from a computer being beyond our reach. To be able to log out remotely, set option “Allow for remote logout of the current user from this computer” in tab Settings – General.
There is no limit of logons to the Comarch IBARD account in the web application available on ibard.com and in the mobile app.
Moreover, Comarch IBARD provides a possibility of adding users to the main account. The owner of Comarch IBARD account can divide its storage capacity among several users by assigning them particular disk space and granting permissions to read/save the data. Each user is provided with a separate login and password to a so-called subaccount, thanks to which he is able to take advantage of all the service functions on his own.
It is a perfect solution if you want to work on the same data both at work and at home and if you want to secure data from several computers in company on one Comarch IBARD account. This opportunity makes Comarch IBARD a perfect business tool for securing and exchanging of data in a small or medium enterprises.
Settings
Comarch IBARD makes it possible to encrypt selected data with the use of the encryption algorithm AES-256 bit. Data is encrypted on the user’s computer with a previously generated individual encryption key. It is possible to encrypt both files and folders, as well as databases.
The encryption key can be generated in Comarch IBARD application installed on user’s computer in tab Settings > Security.
Note: If an encryption key is lost, data encrypted on it will be irreversibly lost. Icomarch24 Company does not store encryption keys generated by IBARD users, so all generated keys should be stored by the user in a secure location.
Comarch IBARD provides possibility of changing the Proxy server settings in a way allowing the application to operate smoothly. Proxy can be set in the Login Panel by clicking on the tab Settings Proxy.
Depending on the service package, there is a possibility to add a user to the Comarch IBARD account.
To add a user to the account, it is necessary to log in to the Comarch IBARD web application, and select the option “Users” in the main menu. Selecting the button “Add User” opens a mini form, where it is necessary to enter a user name, e-mail address and assign quota (the account’s drive space). It is also possible to activate the option “Allow sharing files via link” and “Block Account”. Each new user may individually make use of all service functions.
To add a user to the account, it is necessary to log in to the Comarch IBARD web application, and select the option “Users” in the main menu. Selecting the button “Add User” opens a mini form, where it is necessary to enter a user name, e-mail address and assign quota (the account’s drive space). It is also possible to activate the option “Allow sharing files via link” and “Block Account”. Each new user may individually make use of all service functions.
Comarch IBARD provides a possibility to set daily notifications about the performance of all backup tasks. Daily notifications can be sent via e-mail. To activate summaries on all backup tasks performed by the application, it is necessary to select the tab “Settings” on the left side of the screen, and select the button “Notifications”. In order to receive daily notifications, it is also necessary to choose backup tasks which are to be included in the summaries. To do so, the user needs to select at least one type of notification for a given task. It can be done from the level of the tab “Data backup” by selecting the “bell” button and choosing one of the notifications.
Versioning allows recovering of previously saved versions of files. This feature is useful especially if undesired changes have been made in our resources. Upon enabling option “Enable versioning” (which is available in file context menu) for particular files, previous versions of copied or synchronized data can be easily downloaded (option “Previous Versions” in context menu). Accounts for companies allow for storing of 20 previous file versions.
To activate versioning of files, it is necessary to right click on a file in the folder “My Data”, select the option “Show previous versions” and check the option “Being versioned”.
To activate versioning of files, it is necessary to right click on a file in the folder “My Data”, select the option “Show previous versions” and check the option “Being versioned”.
Backup of files and folders
Tasks backing up files and folders may be configured with the use of the backup creator available from the level of the Comarch IBARD desktop application. To add a backup task, it is necessary to select the tab “Data backup” on the left, and click the button “Add”.
1) First, it is necessary to choose files which are to be backed up. It is possible to select both entire folders and separate files.
2) In the next step, it is necessary to choose a location in the IBARD space in which backed up files are to be stored.
3) The next step is to configure a backup schedule. The user may select a default schedule or set an individual one.
4) It is also possible to define the filters of backed up files. First, it is necessary to enter a filter’s name and specify its parameters. The setting of filters is not obligatory.
The summary of scheduled backups is available from the level of the list of backup tasks. It is possible to set notifications about the status of a given backup task by selecting the bell icon displayed by each task. If there is a considerable number of backup tasks, it is sufficient to select all tasks and select the bell icon on the top bar. You will then receive an e-mail with a report summarizing the statuses of scheduled backups.
A backup schedule allows the user to when the synchronization of files added to a backup will be performed. Schedules not only make it possible to set weekdays when a backup will be performed, but also to select a specific start hour of the synchronization process. Also, on the filter tab it is possible to choose the types of files (by specifying their extension, e.g. *.jpg, *.doc), which are to be included in or excluded from the synchronization process. It is also possible to set such attributes as the filtering of hidden or system files.
Database backup
The reason of empty list of servers can be that add-ons to MSSQL are not installed. These add-ons can be found here (they should be installed in the given order):
For SQL Server 2017
For 32-bit systems:
Microsoft SQL Server System CLR Types:
https://download.microsoft.com/download/C/1/9/C1917410-8976-4AE0-98BF-1104349EA1E6/x86/SQLSysClrTypes.msi
For 64-bit systems:
Microsoft SQL Server System CLR Types:
https://download.microsoft.com/download/C/1/9/C1917410-8976-4AE0-98BF-1104349EA1E6/x64/SQLSysClrTypes.msi
For SQL Server 2016
For 32-bit systems:
Microsoft SQL Server System CLR Types:
https://download.microsoft.com/download/6/4/5/645B2661-ABE3-41A4-BC2D-34D9A10DD303/ENU/x86/SQLSysClrTypes.msi
Microsoft SQL Server 2016 Management Objects:
https://download.microsoft.com/download/6/4/5/645B2661-ABE3-41A4-BC2D-34D9A10DD303/ENU/x86/SharedManagementObjects.msi
For 64-bit systems:
Microsoft SQL Server System CLR Types:
https://download.microsoft.com/download/6/4/5/645B2661-ABE3-41A4-BC2D-34D9A10DD303/ENU/x64/SQLSysClrTypes.msi
Microsoft SQL Server 2016 Management Objects:
https://download.microsoft.com/download/6/4/5/645B2661-ABE3-41A4-BC2D-34D9A10DD303/ENU/x64/SharedManagementObjects.msi
For SQL Server 2014
For 32-bit systems:
Microsoft SQL Server System CLR Types:
https://download.microsoft.com/download/6/7/8/67858AF1-B1B3-48B1-87C4-4483503E71DC/ENU/x86/SQLSysClrTypes.msi
Microsoft SQL Server 2014 Management Objects:
https://download.microsoft.com/download/6/7/8/67858AF1-B1B3-48B1-87C4-4483503E71DC/ENU/x86/SharedManagementObjects.msi
For 64-bit systems:
Microsoft SQL Server System CLR Types:
https://download.microsoft.com/download/6/7/8/67858AF1-B1B3-48B1-87C4-4483503E71DC/ENU/x64/SQLSysClrTypes.msi
Microsoft SQL Server 2014 Management Objects:
https://download.microsoft.com/download/6/7/8/67858AF1-B1B3-48B1-87C4-4483503E71DC/ENU/x64/SharedManagementObjects.msi
For SQL Server 2012
For 32-bit systems:
Microsoft Core XML Services (MSXML) 6.0 Service Pack 1:
http://download.microsoft.com/download/e/a/f/eafb8ee7-667d-4e30-bb39-4694b5b3006f/msxml6_x86.msi
Microsoft SQL Server Native Client:
https://download.microsoft.com/download/3/A/6/3A632674-A016-4E31-A675-94BE390EA739/ENU/x86/sqlncli.msi
Microsoft SQL Server System CLR Types:
https://download.microsoft.com/download/3/A/6/3A632674-A016-4E31-A675-94BE390EA739/ENU/x86/SQLSysClrTypes.msi
Microsoft SQL Server 2012 Management Objects:
https://download.microsoft.com/download/3/A/6/3A632674-A016-4E31-A675-94BE390EA739/ENU/x86/SharedManagementObjects.msi
For 64-bit systems:
Microsoft Core XML Services (MSXML) 6.0 Service Pack 1:
http://download.microsoft.com/download/e/a/f/eafb8ee7-667d-4e30-bb39-4694b5b3006f/msxml6_x64.msi
Microsoft SQL Server Native Client:
https://download.microsoft.com/download/3/A/6/3A632674-A016-4E31-A675-94BE390EA739/ENU/x64/sqlncli.msi
Microsoft SQL Server System CLR Types:
https://download.microsoft.com/download/3/A/6/3A632674-A016-4E31-A675-94BE390EA739/ENU/x64/SQLSysClrTypes.msi
Microsoft SQL Server 2012 Management Objects:
https://download.microsoft.com/download/3/A/6/3A632674-A016-4E31-A675-94BE390EA739/ENU/x64/SharedManagementObjects.msi
For older versions of SQL Server
For 32-bit systems:
Microsoft Core XML Services (MSXML) 6.0 Service Pack 1:
http://download.microsoft.com/download/e/a/f/eafb8ee7-667d-4e30-bb39-4694b5b3006f/msxml6_x86.msi
Microsoft SQL Server Native Client:
http://go.microsoft.com/fwlink/?LinkId=123717&clcid=0x409
Microsoft SQL Server System CLR Types
http://go.microsoft.com/fwlink/?LinkId=123721&clcid=0x409
Microsoft SQL Server 2008 Management Objects
http://go.microsoft.com/fwlink/?LinkId=123708&clcid=0x409
For 64-bit systems:
Microsoft Core XML Services (MSXML) 6.0 Service Pack 1:
http://download.microsoft.com/download/e/a/f/eafb8ee7-667d-4e30-bb39-4694b5b3006f/msxml6_x64.msi
Microsoft SQL Server Native Client:
http://go.microsoft.com/fwlink/?LinkId=123718&clcid=0x409
Microsoft SQL Server System CLR Types
http://go.microsoft.com/fwlink/?LinkId=123722&clcid=0x409
Microsoft SQL Server 2008 Management Objects
http://go.microsoft.com/fwlink/?LinkId=123709&clcid=0x409
Restart the computer after the add-ons are installed.
Prior to a database backup, it is necessary to make sure that MSSQL (Microsoft SQL Server System) addons have been installed. Otherwise, the list of MSSQL servers or the list of databases in the Comarch IBARD database backup creator will be empty.
Tasks backing up databases may be configured with the use of the backup wizard available from the level of the Comarch IBARD desktop application.
1) Select the tab “Data backup” on the left and choose the button “Add”.
2) A window with the database wizard appears.
3) In the first window select a server and authentication. While defining a backup task, it is possible to use either Windows or User authentication. It is also possible to select a folder on the Comarch IBARD drive, where database backups should be stored.
4) At this stage, it is necessary to select databases which are to be backed up to Comarch IBARD. To do so, add relevant databases in the right column.
5) The next stage is the configuration of a backup schedule for the selected databases; you may also set the number of stored copies and differential backups.
It is possible to modify a default schedule or create an individual schedule adjusted to your needs.
By specifying the number of stored copies, you set how many database backups are to be stored on the Comarch IBARD drive at the most.
Specifying the number of differential backups, you may define how many differential backups are to be made after each full backup, and not how many differential backups are to be stored.
6) Click [OK].
The summary of scheduled backups is available from the level of the list of backup tasks. It is possible to set notifications about the status of a given backup task by selecting the bell icon displayed by each task. If there is a considerable number of backup tasks, it is sufficient to select all tasks and select the bell icon on the top bar. Once the backup is performed, you will receive an e-mail with a report summarizing the statuses of scheduled backups.
The number of stored backups may be changed from the level of the database settings window by clicking displayed on the right side of a backed-up database, selecting the option “Settings” and increasing the number of stored backups.
A full backup means that an entire database is backed up. It usually entails a larger file size and a longer time necessary to perform a backup.
A differential backup allows the user to back up only these files which have been added/modified since the last full backup. Such files are usually much smaller, which allows the shortening of backup time, but it is necessary to store at least one full backup associated with the differential backup.
The alternate backup option means that the Comarch IBARD service will perform a full backup and a specified number of differential backups.
1) A database which is to be restored may be selected in the backup task window. After selecting on the right side, it is necessary to choose the option “Restore”.
It is also possible to select a database to be restored directly in the program “Recover database backup”.
2) Next, select a database to be restored.
3) In the next step, it is possible to select a target server, on which the relevant database is to be restored.
4) It is possible to name the database being restored, as well as specify whether the database should be overwritten or whether backup files are to be deleted after successful recovery.
5) Once the operation is finished, the application will display a notification about the successful database recovery.
1) By using Comarch IBARD virtual disk or the web application on www.Comarch IBARD.com, download database full backup copy file (for example: MyDB.SQLServer.2010.10.10_10-01-00.full.bak) and corresponding database differential backup copy file (for example: MyDB.SQLServer.2010.10.10_12-01-00.diff.bak) to a local disk (e.g., on Desktop).
2) In window “Object Explorer” in Microsoft SQL Server Management Studio expand path: “MSSQL Server” > “Databases”
3) Select database with a right-click (if there are no databases, create a new empty one). Select “Tasks” > “Restore” > “Database” from the menu
4) In field “To Database” enter name of the database for which the copy will be restored, it can be the new database or an already existing one.
5) In section “Source for Restore” check option “From Device:”
6) Then, click on the button “…”. In the open window called “Specify Backup” click [Add] to search out and add the full backup file.
Click [Accept] to get back to “Restore Databases” window.
7) Here, mark the file which has just been added on the list. Open the options and check parameter ‘Leave the database non-operational, and do not roll back uncommitted transactions. Additional transaction logs can be restored (RESTORE WITH NORECOVERY)’.
8) Click [OK].
9) On the added database, go to window “Restore Databases”, add differential backup copy file to the manager, and mark it, as in the above case.
10) In the options, check parameter: ‘Leave the database ready to use by rolling back uncommitted transactions. Additional transaction logs cannot be restored (RESTORE WITH RECOVERY)’.
11) Click [OK].
A database backup is among the processes imposing the highest load on system resources such as RAM, processor usage, hard drive space, or capacity of the Internet connection. It also affects efficiency of the database server operation.
When configuring a schedule according to which database backups will be created, you must be particularly cautious when determining time and frequency of backup execution.
Backups carried out too frequently can significantly reduce efficiency of a computer as well as the database server.
It is recommended to create backup copies of regular databases once a week. In case of databases containing accounting data or other important or frequently changing data, it is recommended to carry out a backup once a day, preferably at the end of a working day.
The best moment for creating of backup copies are evening and night hours, since this is the time when most of the systems are idle.
In order to change schedule, login to Comarch IBARD application, click on tab “Data backup” > “Schedules” and edit the schedule assigned to database backup tasks.